React Native Firebase
Welcome to React Native Firebase! To get started, you must first setup a Firebase project and install the "app" module.
React Native Firebase is the officially recommended collection of packages that brings React Native support for all Firebase services on both Android and iOS apps.
Prerequisites
Before getting started, the documentation assumes you are able to create a project with React Native and that you have an active Firebase project. If you do not meet these prerequisites, follow the links below:
Installation
Installing React Native Firebase requires a few steps; installing the NPM module, adding the Firebase config files & rebuilding your application.
1. Install via NPM
Install the React Native Firebase "app" module to the root of your React Native project with NPM or Yarn:
# Using npm
npm install --save @react-native-firebase/app

# Using Yarn
yarn add @react-native-firebase/app
The @react-native-firebase/app module must be installed before using any other Firebase service.
2. Android Setup
To allow the Android app to securely connect to your Firebase project, a configuration file must be downloaded and added to your project.
Generating Android credentials
On the Firebase console, add a new Android application and enter your projects details. The "Android package name" must match your
local projects package name which can be found inside of the manifest tag within the /android/app/src/main/AndroidManifest.xml
file within your project.
The debug signing certificate is optional to use Firebase with your app, but is required for Dynamic Links, Invites and Phone Authentication. To generate a certificate run
cd android && ./gradlew signingReport. This generates two variant keys. You have to copy both 'SHA1' and 'SHA-256' keys that belong to the 'debugAndroidTest' variant key option. Then, you can add those keys to the 'SHA certificate fingerprints' on your app in Firebase console.
Download the google-services.json file and place it inside of your project at the following location: /android/app/google-services.json.
Configure Firebase with Android credentials
To allow Firebase on Android to use the credentials, the google-services plugin must be enabled on the project. This requires modification to two
files in the Android directory.
First, add the google-services plugin as a dependency inside of your /android/build.gradle file:
buildscript {
  dependencies {
    // ... other dependencies
    classpath 'com.google.gms:google-services:4.3.10'
    // Add me --- /\
  }
}
Lastly, execute the plugin by adding the following to your /android/app/build.gradle file:
apply plugin: 'com.android.application'
apply plugin: 'com.google.gms.google-services' // <- Add this line
3. iOS Setup
To allow the iOS app to securely connect to your Firebase project, a configuration file must be downloaded and added to your project.
Generating iOS credentials
On the Firebase console, add a new iOS application and enter your projects details. The "iOS bundle ID" must match your local project bundle ID. The bundle ID can be found within the "General" tab when opening the project with Xcode.
Download the GoogleService-Info.plist file.
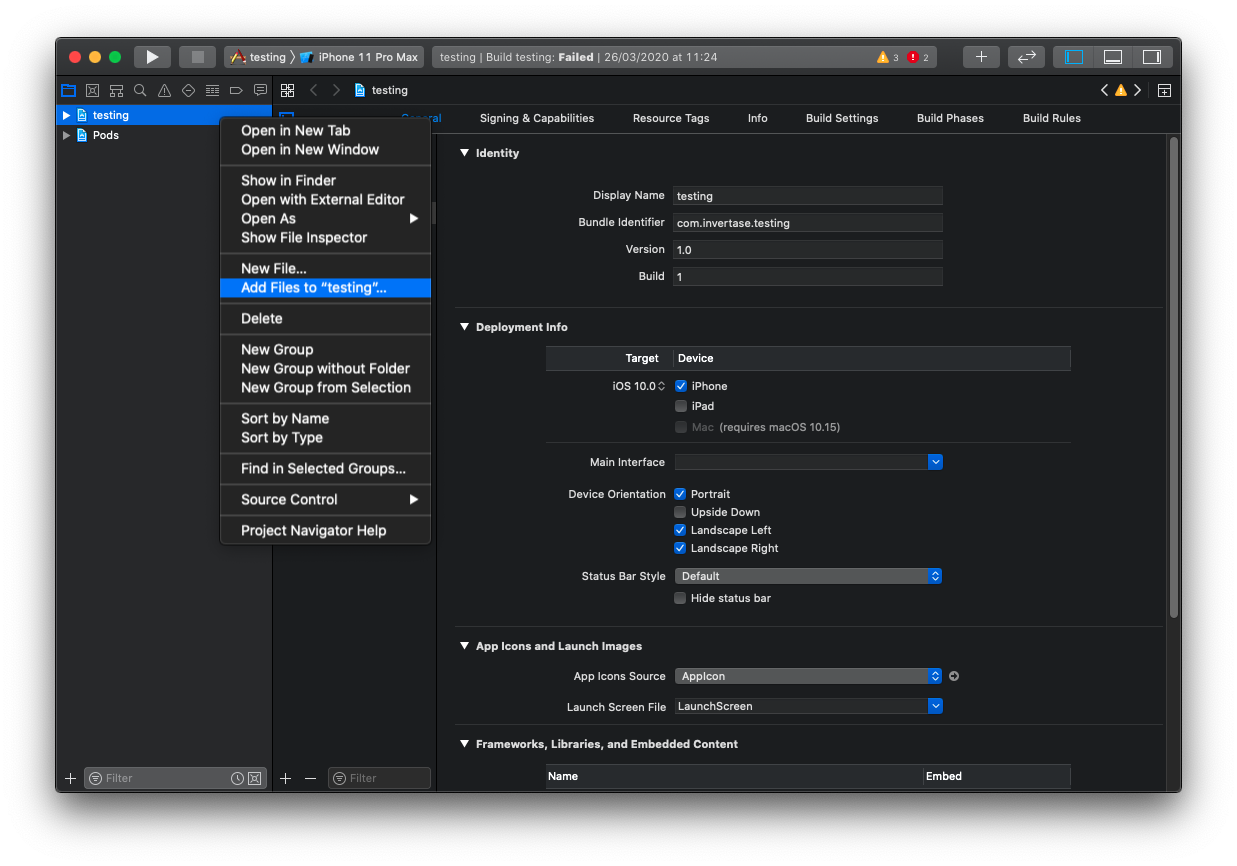
Using Xcode, open the projects /ios/{projectName}.xcodeproj file (or /ios/{projectName}.xcworkspace if using Pods).
Right click on the project name and "Add files" to the project, as demonstrated below:
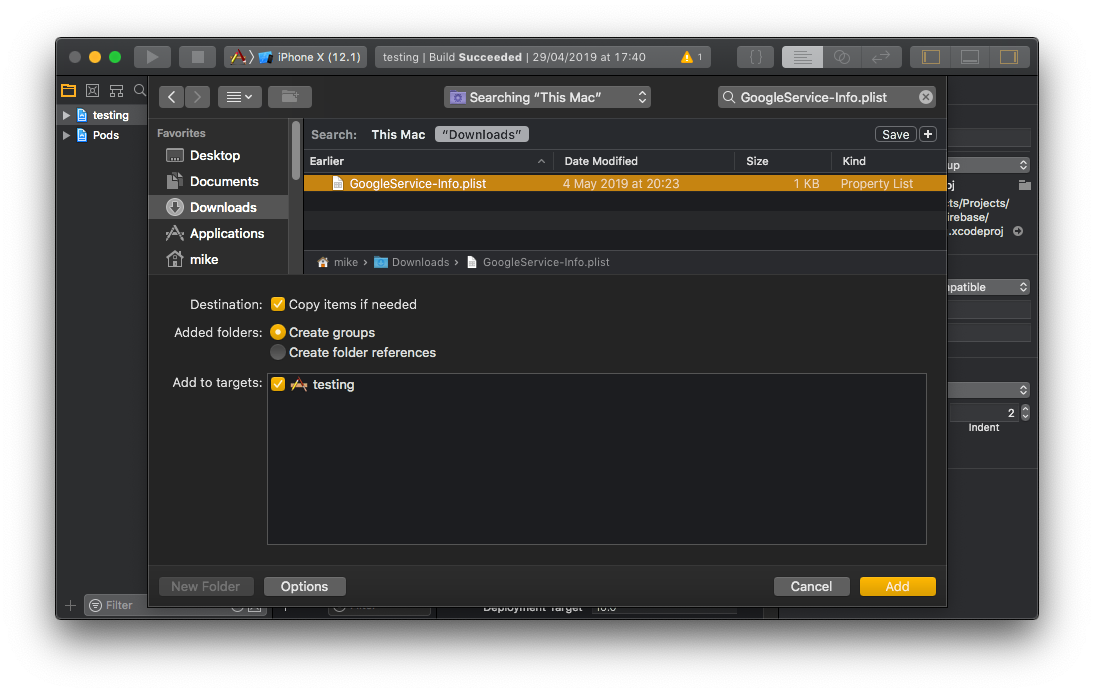
Select the downloaded GoogleService-Info.plist file from your computer, and ensure the "Copy items if needed" checkbox is enabled.
Configure Firebase with iOS credentials
To allow Firebase on iOS to use the credentials, the Firebase iOS SDK must be configured during the bootstrap phase of your application.
To do this, open your /ios/{projectName}/AppDelegate.m file, and add the following:
At the top of the file, import the Firebase SDK:
#import <Firebase.h>
Within your existing didFinishLaunchingWithOptions method, add the following to the top of the method:
- (BOOL)application:(UIApplication *)application didFinishLaunchingWithOptions:(NSDictionary *)launchOptions {
  // Add me --- \/
  [FIRApp configure];
  // Add me --- /\
  // ...
}
4. Autolinking & rebuilding
Once the above steps have been completed, the React Native Firebase library must be linked to your project and your application needs to be rebuilt.
Users on React Native 0.60+ automatically have access to "autolinking", requiring no further manual installation steps. To automatically link the package, rebuild your project:
# Android apps
npx react-native run-android

# iOS apps
cd ios/
pod install --repo-update
cd ..
npx react-native run-ios
Once successfully linked and rebuilt, your application will be connected to Firebase using the @react-native-firebase/app module. This module does not provide much functionality, therefore to use other Firebase services, each of the modules for the individual Firebase services need installing separately.
Manual Linking
If you're using an older version of React Native without autolinking support, or wish to integrate into an existing project, you can follow the manual installation steps for iOS and Android.
Miscellaneous
Android Enabling Multidex
As your application starts to grow with more native dependencies, your builds may start to fail with the common
Execution failed for task ':app:mergeDexDebug' error. This error occurs when Android reaches the
64k methods limit.
One common solution is to enable multidex support for Android. This is a common solution to solving the problem, however it is recommended you read the Android documentation to understand how it may impact your application.
Hermes Support
To support the Hermes JavaScript engine, React Native 0.64.0 or newer is required. However, we cannot guarantee that React Native Firebase works perfectly on it, so please test your project carefully.
Overriding Native SDK Versions
React Native Firebase internally sets the versions of the native SDKs which each module uses. Each release of the library is tested against a fixed set of SDK versions (e.g. Firebase SDKs), allowing us to be confident that every feature the library supports is working as expected.
Sometimes it's required to change these versions to play nicely with other React Native libraries; therefore we allow manually overriding these native SDK versions.
Using your own SDK versions is generally not recommended as it can lead to breaking changes in your application. Proceed with caution.
Android
Within your projects /android/build.gradle file, provide your own versions by specifying any of the following options shown below:
project.ext {
  set('react-native', [
    versions: [
      // Overriding Build/Android SDK Versions
      android : [
        minSdk    : 16,
        targetSdk : 30,
        compileSdk: 30,
        buildTools: "30.0.2"
      ],

      // Overriding Library SDK Versions
      firebase: [
        // Override Firebase SDK Version
        bom           : "28.3.1"
      ],
    ],
  ])
}
Once changed, rebuild your application with npx react-native run-android.
iOS
Open your projects /ios/Podfile and add any of the globals shown below to the top of the file:
# Override Firebase SDK Version
$FirebaseSDKVersion = '8.5.0'
Once changed, reinstall your projects pods via pod install and rebuild your project with npx react-native run-ios.
Increasing Android build memory
As you add more Firebase modules, there is an incredible demand placed on the Android build system, and the default memory
settings will not work. To avoid OutOfMemory errors during Android builds, you should uncomment the alternate Gradle memory
setting present in /android/gradle.properties:
# Specifies the JVM arguments used for the daemon process.
# The setting is particularly useful for tweaking memory settings.
# Default value: -Xmx10248m -XX:MaxPermSize=256m
org.gradle.jvmargs=-Xmx2048m -XX:MaxPermSize=512m -XX:+HeapDumpOnOutOfMemoryError -Dfile.encoding=UTF-8
Android Performance
On Android, React Native Firebase uses thread pool executor to provide improved performance and managed resources.
To increase throughput, you can tune the thread pool executor via firebase.json file within the root of your project:
// <project-root>/firebase.json
{
  "react-native": {
    "android_task_executor_maximum_pool_size": 10,
    "android_task_executor_keep_alive_seconds": 3
  }
}
| Key | Description |
|---|---|
android_task_executor_maximum_pool_size | Maximum pool size of ThreadPoolExecutor. Defaults to 1. Larger values typically improve performance when executing large numbers of asynchronous tasks, e.g. Firestore queries. Setting this value to 0 completely disables the pooled executor and all tasks execute in serial per module. |
android_task_executor_keep_alive_seconds | Keep-alive time of ThreadPoolExecutor, in seconds. Defaults to 3. Excess threads in the pool executor will be terminated if they have been idle for more than the keep-alive time. This value doesn't have any effect when the maximum pool size is lower than 2. |
Allow iOS Static Frameworks
If you are using Static Frameworks on iOS, you need to manually enable this for the project. To enable Static Framework
support, add the following global to the top of your /ios/Podfile file:
$RNFirebaseAsStaticFramework = true
Expo
Integration with Expo is possible in both bare workflow and custom managed workflow via config plugins.
React Native Firebase cannot be used in the "Expo Go" app, because it requires custom native code.
Installation
If you're using Bare Workflow, please follow the above installation steps instead.
After installing the @react-native-firebase/app NPM package, add the config plugin to the plugins array of your app.json or app.config.js.
Also, you have to provide paths to the google-services.json and GoogleService-Info.plist files by specifying the expo.android.googleServicesFile and expo.ios.googleServicesFile fields respectively.
The app.json for integration that included the optional crashlytics and performance as well as the mandatory app plugin would look like this, customize based on which optional modules you use:
{
  "expo": {
    "android": {
      "googleServicesFile": "./google-services.json"
    },
    "ios": {
      "googleServicesFile": "./GoogleService-Info.plist"
    },
    "plugins": [
      "@react-native-firebase/app",
      "@react-native-firebase/perf",
      "@react-native-firebase/crashlytics"
    ]
  }
}
Next, rebuild your app as described in the "Adding custom native code" guide.
Config plugins are only required for React Native Firebase modules, which require custom native installation steps - e.g. modifying the Xcode project, Podfile, build.gradle, AndroidManifest.xml etc. Packages without native steps required will work out of the box.
Not all React Native Firebase packages have Expo config plugins provided yet. You may see if a module is supported by checking if it contains the
app.plugin.jsfile in its package directory.If you're using the Expo Tools VSCode extension, the IntelliSense will display a list of available plugins, when editing the
pluginssection ofapp.json.
